Budget-Friendly Way to Upgrade Your Chevy Rearend to a Ford 9-Inch and Retain Your GM Brakes!
If you want to move to a Ford 9-inch rear and retain your GM brakes, this is the right move for your hot rod project.
When building a project car, nothing is worse than having to re-buy performance parts. This is especially true today when every hot rod dollar needs to be stretched as far as possible. For instance, let’s say that one of your first upgrades was new wheels and some better brakes. Later down the line, you decide you want to ditch your GM rear and move to a Ford 9-inch. The problem is that you now have to buy new brakes, or at the minimum new brake parts, to work with the new ends on the Ford 9-inch. Currie Enterprises heard this complaint enough times to get the hint and developed a way for swappers in this predicament to avoid spending unnecessary cash. Their new hybrid housing lets those who want the benefits of a Ford 9-inch rear easily run their GM style drum or disc brakes.
AI Quick Summary
Currie Enterprises offers a hybrid housing to upgrade a Chevy rearend to a Ford 9-inch while retaining GM brakes. This allows hot rod enthusiasts to save money by using existing GM brakes and easily install high-performance options later. The process ensures proper alignment and durability.
This summary was generated by AI using content from this MotorTrend article
Read Next
0:00 / 0:00

We had a Chevelle wagon that would eventually be getting some Wilwood brakes on the four corners, but for now it had to be drivable. By running the new Currie hybrid housing, we could roll on the stock drum brakes for now, and when the time came, we could bolt on some high-performance disc brakes we would be good to go. Life is always easier when you have options. This route would also be great if you already had nice aftermarket GM brakes and didn’t want to waste money on new brackets/brakes to fit your fresh Ford 9-inch rear.

Here are the five parts that make up a Currie hybrid 9-inch housing.

The key component to this housing’s ability to run GM style brakes are these steel ends designed by Currie Enterprises.

To maintain rigidity, an iron housing was bolted to the center section. After that the axle tubes were inserted and tapped into place to achieve the proper overall length. We had Currie make our housing 2 inches narrower so we can get a bit more dish in our new rear wheels.

With everything lined up and squared, the tubes and ends were then tacked in place with a MIG welder.

It was then time for the hardcore welding. This was done on a rotary jig, which really helps churn out beautiful welds.

Once the tubes and ends were fully welded, it was time to install the brackets specific to our Chevelle. First up, the mounts for our upper control arms were tacked in place. Currie uses a jig to make sure they end up in just the right spot for proper alignment and geometry.

Then it was time to install the lower control mounts, shock mounts, and spring perches. Currie separates the shock and control arm mounts. This enables them to be moved inboard to clear larger tires.

With everything fully welded, the housing was then sent out back to make sure it’s straight, since the tubes tend to distort under all the heat from welding. Once true, it was stuffed into this media blast chamber where it was cleaned in preparation for paint.

Rather than rubber bushings, Currie likes to install their greaseable Johnny Joints. They won’t distort like rubber bushings, and they are completely rebuildable. As a side bonus, they’re also a bit easier to install compared to rubber.

The Chevelle wagon this rear is going into is destined for cruising and the occasional autocross, so for a center section we didn’t need anything exotic. The 9+ Nodular Sportsman case is stuffed with a T.S.D. limited-slip unit, 3.50 gears, 9+ pinion support, and a short 1330 9+ yoke. The result is a solid, posi-equipped third member that won’t put you in the poor house.

The center section was then bolted to the housing and torqued to spec.

And with that, our painted housing was ready to be installed under our Chevelle. If you’re curious about the paint color, it’s Seymour Original Cast Blast 14-048 Cast Iron spray paint.

Behold the glory of our stock peg-legged 10-bold GM rearend.

For this swap we needed the backing plates, so that meant we had to pull the axles. The first step was to remove the rear cover to gain access to the C-clips.

We then removed the four bolts that secured the brake assembly to the housing.

With the GM brakes removed, we could go ahead and remove the GM 10-bolt rearend assembly.

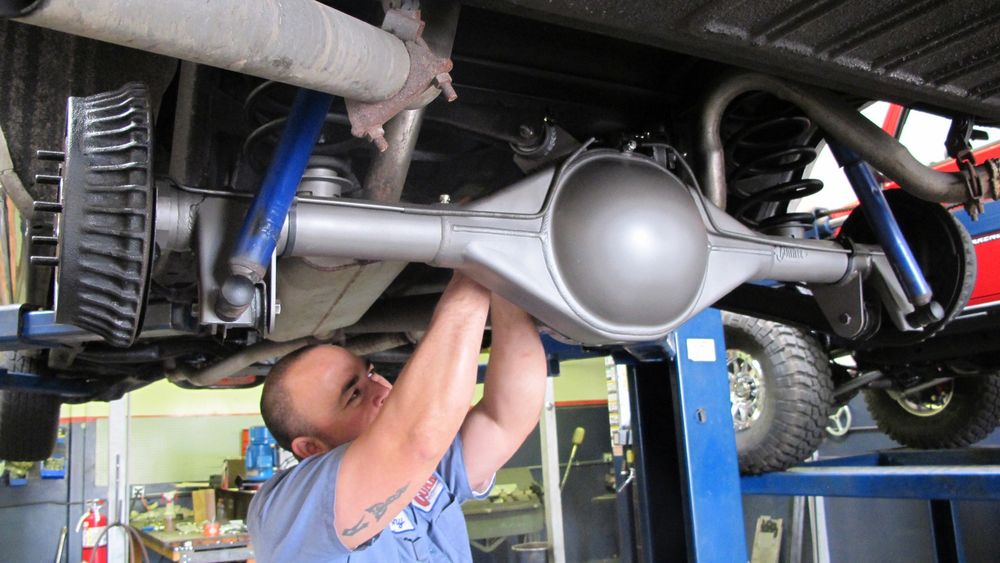
The new rear housing bolted into place just like a GM unit and all the brackets lined up as expected. Everything should be this easy.

We then moved onto the new Currie 31-spline axles. To make these work in our Ford/GM hybrid housing Currie first pressed on an axle bearing offset spacer. The new O-ring bearing is roughly twice the size of the stock bearing and will be able to hold up to a ton more abuse.

After removing all the hardware from the backing plates, Currie then slid them onto the axle and pressed on the new bearings. The backing plate will serve as the new bearing retainer plate.

Before installing the axles, the housing ends were greased. The fit was tight, so the axles needed to be persuaded into place with a dead blow hammer. Once the axles were fully seated, the backing plates were secured with 3/8-inch T-bolts.

Since it was going to be months before we could do the rear disc brakes, we went ahead and serviced factory drum brakes using a Currie kit.

To clear the new shouldered studs, we had to open up the holes a touch. Once done, we dropped in three quarts of Currie’s 9+ 85-140 weight gear oil along with 4 ounces of traction lock additive. We also reused the brake lines from our old 10-bolt.

When we finally upgraded to the rear Wilwood disc brakes, they bolted in place.
Born and raised in Southern California I started as the technical editor for Popular Hot Rodding (PHR) magazine where I learned the business before moving over to work with Nick Licata, at Camaro Performers, as his tech editor. At PHR I built a 1968 Camaro called Bad Penny that was one of the earlier pro-touring cars that actually ran the track hard. We won the first Optima Ultimate Street Car Invitational in 2008 and placed well several other years. At Camaro Performers we started several project cars and did a ton of tech. Eventually I was made editor of Vette magazine for a short time before being slotted to run Super Chevy magazine. Running the brands was fun, but I've always enjoyed being a technical writer more. So after more than 15 years I'm back to writing tech content, this time for the HOT ROD network. I enjoy being with my family, shooting, and working on my latest car, a 1969 Camaro called Tri Tip.
Read More